 Users GuideUsers Guide
This is the users guide to the Stecware Looper Pro software for the Lexicon JamMan audio looper and the Lexicon Reflex. The guide is broken up into the following sections:

 Features
The Looper Pro takes the live looping experience to a new level with the following features:
OverviewThe Looper Pro software turns your existing JamMan into a live multi-tracking looper and system controller. Up to 8 loops can be played simultaniously with complete control over level and position of the loop in the stereo output mix.

Though the JamMan hardware can only record one channel at a time, its output is stereo so you can literally spread your loops around the room. Up to 8 seperate mix Pages allow you to loop over different grooves or chord changes with completely seperate level and pan controls for each loop channel. Like the original JamMan, the Looper Pro also provides rock solid sync to drum machines, samplers and sequencers using MIDI clock.
In addition to original Layer, Replace and Mute functions, the Looper Pro adds "Delay", "Make Room" and "DFade" functions which can be applied to each loop channel independently. The Delay feature allows you to change one of the active loops into a syncronized echo with feedback control and a divide feature that splits the loop up into syncronized echos. The Make Room function allows you to keep adding new audio to your loops indefinetly without overloading by monitoring signal level and automatically reducing the level when it approaches clipping. The DFade function decreases the level of the audio in a loop while not adding new content (Destructive Fading).
A slap echo effect with level and delay time control was added to provide some simple ambience without adding any gear to your rack. An internal click with controllable level was added to help you stay in sync with the loops when no drum machine is being used.
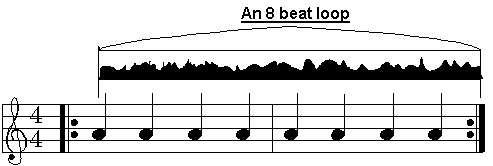
The number of beats for each mixer page (8 loops) can be set between 1 and 127 allowing odd time signatures to be used with drum machines and the built in click. Loops can be set to repeat infinetly or a fixed number of times allowing you to easily bring certain loops in and out of the mix. An automatic master fade feature reduces the main output level of the looper to gracefully end a performance.
The Looper Pro also contains a flexible MIDI Re-Mapper that allows you to control all of the gear in your rack from a single simple MIDI foot controller. Organized in banks of 10 command sets, the Re-Mapper converts a MIDI Controller or Program Change message into one or more Program Change, Controller, Note On/Off or SysEx messages that can control the JamMan or any other piece of MIDI controllable gear in your rack. Configuration of the Re-Mapper is made easy with the intuitive Looper Pro Editor for Windows and Mac computers.
Software InstallationThis section describes how to install the Looper Pro software in your JamMan. Note that this is only rough installation guide. Refer to the Looper Pro homepage (www.LooperPro.com) or the Looper Pro Forum for additional information on installing the software.
The software itself comes in the form of a ROM (read only memory) that must be installed in the circuit board inside the JamMan.
Testing the Installation
It's important to check the system before replacing the covers since it's fairly easy to bend a pin on the ROM during installation and a reasonable amount of work putting the covers on then taking them off. It's best to check the system with just the front panel installed.
Place the unit on a non conductive surface (non-metal table, cardboard, etc..).
Plug in the power supply and confirm that the display spells out "L o o p e r P r o" followed by dashes and some numbers on power up. The numbers indicate the version of the Looper Pro software installed in your system. This should match the label on the ROM. The display will then revert to the value of the parameter selected by the right front panel knob.
Front Panel Controls 
This section describes the front panel controls with the Looper Pro software.
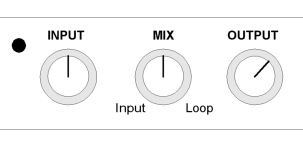
Indicates the level of the audio feeding the system and playing back (red = overload)
Sets the audio level of the signal feeding the looper. Adjust this till the Signal LED is no longer red.
Sets the balance between loop/slap/click audio and the input signal. Note - When using MIDI control of input level, set this to fully clockwise.
Sets the overall output level of the looper. Note that there is also a MIDI controllable Output Level parameter that can be used in conjunction with the analog OUTPUT Level Pot.
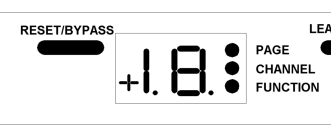
The Reset/Bypass button performs two seperate functions depending on how it's used:
The plus sign is appears when a new Loop Channel or Mixer Page is enqueued. The plus sign goes off at the end of the next master loop, at which time the channel or page will be enabled or initialized.
The numeric display shows a variety of things at differnt times. Normally, the display shows the current value of the parameter selected by the Parameter knob on the right of the front panel. When the Parameter knob is turned, however, the display spells out the name of the selected parameter (approximations are made for names that cannot be displayed with the 7 segment display. i.e. n is displayed for both n and m. H is displayed for both h and x). In some cases, the value of the parameter itself is displayed as a word (Loop Functions, Init Mode, etc..).
The display also displays error messages and status information when the state of the system changes. For instance, an animated circular pattern is shown when a loop is being initialized or in the Replace mode. These special displays are shown in the associated section of the users guide.
When the Page LED is lit, it indicates that the display is showing the Page number. When the LED blinks, it indicates that the displayed Page is active. When the LED is on solid, it indicates that the page is only selected and not active. This is typically the case when adjustments are being made to page/channel parameters during set up.
When the Channel LED is lit, it indicates that the displayed is showing the Channel. When the LED blinks, it indicates that the displayed Channel is active.When the LED is on solid, it indicates that the Channel is only selected but not active. "Selected" Channels can be adjusted for Level, Pan, etc.. but the Channel must be made "active" to be operated on by the Loop Functions.
When the Function LED is lit, it indicates that the displayed is showing the Loop Function. When the LED blinks, it indicates that the displayed Loop Function is active. When the LED is on solid, it indicates that the Loop Function is only selected but not active. "Selected" Loop Functions are made active by pressing the Tap button or triggering a Tap command.
The small dot at the bottom right of the numeric display indicates the presence of incoming and outgoing MIDI data.
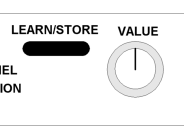
The Learn/Store button performs two functions: patching (learning) incoming MIDI Continuous Controllers to front panel parameters and storing the current configuration in internal memory for later recall.
The Value knob allows the user to change the value of the parameter selected by the Parameter Knob. The updated parameter value appears on the display.
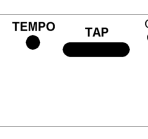
The Tempo LED indicates the tempo defined for the Master Loop (channel 1). The LED blinks once for each quarter note beat. The LED stays lit a little longer at the loop edge as a visual indication.
The Tap button performs different functions depending on when it is pressed.
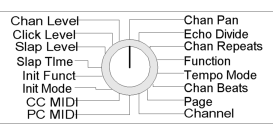
The Parameter knob allows the user to select a parameter to edit. As the knob is turned, the display shows the current value of the selected parameter. After the knob has stopped turning for 2 seconds, the name of the parameter is spelled out on the Looper Pro display. Note that some of the names are approximations due to the limited display.
ParametersThis section describes the parameters that can be adjusted from the front panel of the Looper Pro.
Loop Functions are the operations that can be performed on each loop channel. Typical Loop Functions include Layer, Replace, Mute, etc.. Refer to the main Loop Functions section for a complete list of functions with descriptions of each.
This is the MIDI Channel that program change messages sent to the Looper Pro should use.
This is the MIDI channel that continuous controllers being sent to the Looper Pro should use to adjust parameters. A seperate channel was provided to allow control of the Looper Pro via program change but provide pass through of controllers for other devices (volume control, wah, etc..) from MIDI foot controller.
This defines the length of the built in slap delay. The Slap Level can be adjusted from 0-15 with 0 equal to 35ms and each tick adding 5ms for a max of 105ms.
This defines the audio level of the built in slap delay. The Slap Level can be adjusted from 0-15 from the front panel but have a resolution of 0-127 via MIDI.
This defines the audio level of the built in click. The click is output on the left channel only and is not perminantly added to the loop audio (it can be adjusted while loops are in memory). The Click Level can be adjusted from 0-15 from the front panel but have a resolution of 0-127 via MIDI.
This parameter is used with the Echo Function. The Echo Divide parameter specifies how many times a loop will be divided when the Echo Function is enabled on it. For instance, if you created a loop that was 4 seconds long and set the Echo Divide parameter for 4 then enabled the Echo Function on the loop, the loop would turn into 1 second echos. If the Echo Divide was set for 2, you'd get 2 second echos. Refer to the Echo Function for additonal details.
This parameter allows you to select a particular loop channel to edit or initialize. Refer to the Loop Channel section for details.
This parameter allows you to select a particular mixer page to edit or initialize. Refer the Mixer Page section for details.
Each Loop Channel on the Looper Pro has the following parameters that define the channel's behavior:
Refer to the Loop Channel section for descriptions of these parameters.
This sets the rate at which the level of audio will be reduced when the Destructive Fade Function is being used.
This sets the level of the dry signal being fed to the output mix when the front panel Mix knob is set to 100% wet. This was added so that the dry level could be adjusted via MIDI.
This sets the left/right position of the dry signal in the output mix.
This sets the amount of output audio that is feed back into the input when the Echo Function is being used on a particular loop channel. Values of 0-15 are available with 0 = off and 15=infinite.
This defines how many beats/quarter notes will be used per bar/measure by the system. This is important when loop channels are being initialized using Quantize To Bar.
This defines the left/right position of the slap echo in the output mix.
This defines a MIDI note that can be generated by the sytem for every beat of the Master loop (page 1, channel 1). The default value is 0 which disables the feature but any value up to 127 can be used. The note is hardwired to MIDI Channel 10 for drums with a velocity of 127.
Loop ChannelsThe Looper Pro allows up to 8 loops to be active at a time but manages them as channels in a mixer.
Like a conventional audio mixer, the Looper Pro mixer allows the level and pan of each channel to be adjusted or for the channel to be muted. Because the audio that feeds the Looper Pro mixer is audio loops, additional parameters are available for each channel that control its current state as well as how and when it will be initialized. The following parameters are available for each Looper Pro channel:
This defines the audio level of the selected loop channel on the current page. The resolution of this parameters is 0-15 from the front panel (0 = muted, 15 = max), but can be controlled via MIDI controller with a resolution of 0-127. There is a seperate Level value saved for each channel on each page. For instance, loop channel 2 might be fairly soft on Page 1 but may be loud on page 2.
This defines the position of the loop channel in the stereo output mix for the current page. The resolution of this parameters is 0-15 from the front panel (0 = left, 15 = right), but can be controlled via MIDI controller with a resolution of 0-127. There is a seperate Pan value saved for each channel on each page. For instance, loop channel 1 might be panned to the left on Page 1 but may be panned to the center on page 2.
This defines the number of beats associated with a particular loop channel.
This only affects operation when the Channel Init Mode is set for Fixed Size and when the Master Loop (page 1, channel 1) is being created. The number of beats defined for the Master Loop effectively defines the time signiture for the tune since it defines how many clicks and MIDI Clocks will be output (or expected when slaved to MIDI Clock).
This defines how many times a loop channel will play back after being triggered. When set for 0, the loop plays forever but values of 1-127 can be used to set fixed numbers of playbacks for a particular loop channel.
This parameter defines how a particular channel will be initialized. All channel loop initialization begins on the Master Loop (page 1, channel 1) edge. The following options are available:
This defines the initial loop Function that will be active after a loop has been created. The default Function is "Loop" so that the new loop beings playing back as soon as it has been initialized but if the Mute Function were selected, the new loop would be muted as soon as it was done recording. This could be useful if you wanted to record a loop but have it magically appear later in the song, perhaps after a bridge.
To edit these parameters from the front panel, you set the Mode knob to Channel and select the channel you'd like to edit, then turn the Mode knob to the parameter you'd like to edit and make adjustments (level, pan, etc..). The adjustments will only affect the selected channel in the selected page.
When you select a channel from the front panel, you can also initialize that channel or make it active by pressing the Tap button. If the channel has not been initialized, pressing Tap will enqueue an init for the channel at the next Master Loop boundry (see the Channel Init Mode). If the channel has already been initialized, pressing tap will simply make it active. Once a channel has been made active, it can be manipulated with the Loop Functions.
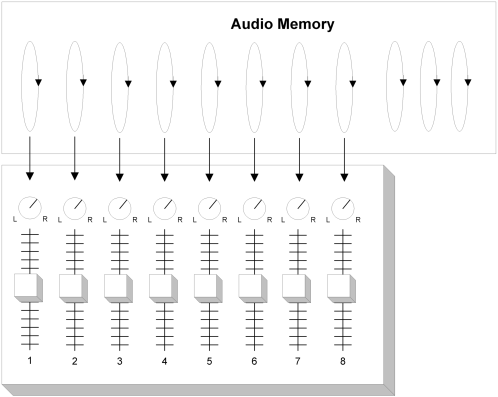
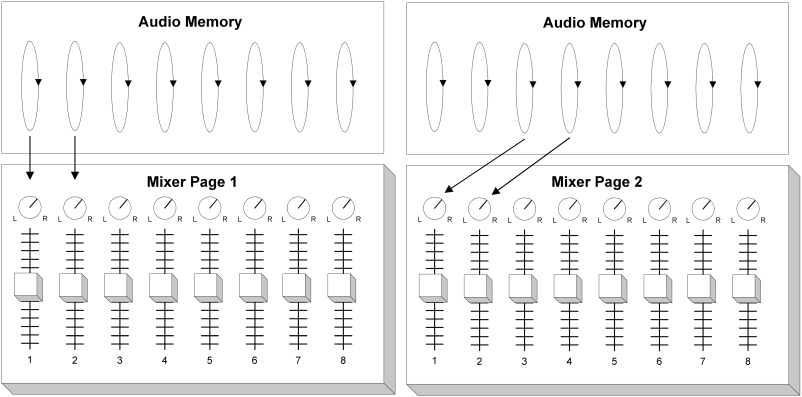
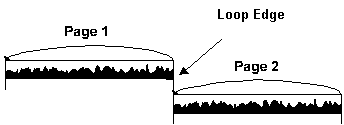
Mixer PagesThe Looper Pro organizes your loop into channels of a mixer for simultanious playback, but also groups of Loop Channels to be organized serially for sequencial playback using Loop Pages. Wiith each Loop Page is a new set of Loop Channels and mixer settings. The following image shows the relationship of loops in memory to the Mixer Pages:
 .
.
As you can see, when you switch to Mixer Page 2, the third and fourth loops are fed to channels 1 and 2 while on Page 1 the first and second loops are fed to channels 1 and 2. In other words, when you switch Mixer pages, you can no longer hear the loops assocated with the previous page.
Mixer pages are useful when you are performing a song that has several completely different sections. i.e. 'B' or 'C' sections. An example would be in a blues song where the first 8 beats may be an A chord but the next 8 beats are on a D. Page 1 would contain the loops based on the A chord while Page 2 would contain the loops based on the D chord.
For each Mixer Page, the Loop Channel parameters are unique. Channel 1 on Mixer Page 1 may be 4 beats and be panned to the left while channel 1 on Mixer Page 2 might be 1 beat and panned to the center. Mixer Pages are one way of making dramatic changes to what the audience is hearing in an instant.
When using the Mixer Pages to manage sections of a song, you must first select the target Page then the Loop Channel before making channel adjustments. Again, the channel settings for each page are independent.
Channel parameters can be changed at any time for Mixer Pages by simply selecting the Page (turn the right knob to the Page position then turn the Value knob), then selecting the channel on that page that you want to edit. When making these kinds of changes, the Page does not need to be initialized with any Loop audio. This is typically setup that is done before beginning a performance.
When the performance actually begins, new Mixer Pages are initialized when the new Page is "Enqueued for Init". When Mixer Pages are Enqueued for Init, the + sign appears on the display and the Page LED is lit. On the next master loop edge, the first channel of the new Mixer Page is initialized.
Pages can be enqueued from the front panel by selecting the desired Page then pressing the Tap button or from footswitch or MIDI commands.
Once a page has been initialized, transitions to other Mixer Pages must still be enqueued with the + sign appearing on the display but no Loop Channel initialization occures.
Once on a new page, additional Loop Channels can be initialized by selecting the channel and enqueing the channel init (refer to the Loop Channel section for details).
Loop Functions This section describes the Loop Functions which can be applied to each Loop Channel.
| Id | Name | Description |
| 0 | Loop | This is the standard operating mode fo the loop. Playback, etc.. |
| 1 | Layer | Allows new audio to be added to a Loop |
| 2 | Make Room | Allows new audio to be added to a loop but reduces the level of the old audio if it overloads |
| 3 | Replace | Replaces the previous audio with new. Deletes, etc.. |
| 4 | Mute | Mutes the audio level for this channel |
| 5 | Destructive Fade | Gradually reduces the audio signal of a recorded loop |
| 6 | Echo | Turns the loop channel into an echo |
This is the normal operating mode of a Loop Channel. If the loop has been initialized, the audio will play back.
This function allows new audio to be added to an existing loop. Any new audio you feed to the looper will be mixed with the previous loop contents, saved in memory and played back on the next cycle of the loop.
Note that this is a destructive operation. The only way to remove layered audio is to Mute it or Replace it.
This function is similar to the Layer feature in that new audio is added to the previous contents of a loop. With Make Room, however, the level of the audio signal in the loop is monitored and, if too loud, is perminantly reduced. The result is that you can keep adding new audio to a loop and never have it overload. At any time you can toggle back to the Loop Function to loop the current mixture of layers forever (without adding more).
This function replaces the audio stored in a Loop Channel. None of the previous contents of the loop is kept.
Note that Replace can be quickly turned on and off to replace just sections of a Loop Channel or run continuously until you have something you like in your loop.
This mutes the audio for a channel. This is similar to the mute buttons on channels of a mixer.
This slowly decreases the level of the signal in Loop Channel. This can be used to gradually decrease the level of a channel as part of the mix but can also be used to free up a loop. Once faded, the audio level cannot be restored.
Note that the rate at which the audio is decreased is controlled by the master Destructive Fade rate parameter.
This function puts the Loop Channel into an echo/delay mode where audio only repeats one time based on the size of the Loop Channel. For instance, if you had a 4 beat loop and enabled the Echo Function, you would have a 4 beat echo; you'd hear any audio you send the system 4 beats later.
The Echo function as two Channel parameters that enhance its operation: Echo Divide and Feedback. The Divide parameter allows the overall length of the Loop Channel to be divided when put in the Echo mode. The Feedback parameter defines how much of the Echo audio to mix in with the new audio. When the Feedback is set to its maximum setting, you effectively have a loop. Refer to the Feedback and Echo Divide sections for additional details.
Audio ConnectionsThis section describes some of the ways the Looper Pro can be connected to your sound system.
An in-line configuration simply puts the Looper Pro between your instrument and the the amplifier or PA. The musical instrument is either plugged directly into the Looper Pro or into a stomp box the feeds the looper. The output of the Looper Pro will feed an instrument amplifier or PA.
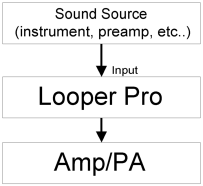
Because the Looper Pro includes a built in slap delay, even a simple system as shown in this diagram can make a big sound.
When your sound system includes a mixer with an effects send, the Looper Pro can be applied to more than one sound source.
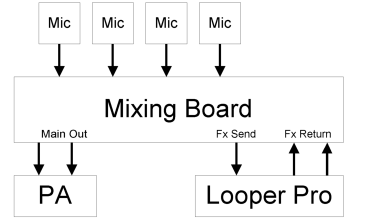
Connect the Looper Pro to your mixer much like you would an external reverb device: connect an aux send to the input of the Looper Pro and connect the Looper Pro outputs to an effect return or other input back to the board. When a stereo sound system is being used, be sure to connect the left and right outputs of the Looper Pro to seperate inputs (or a stereo input) in order to make full use of the channel Pan control.
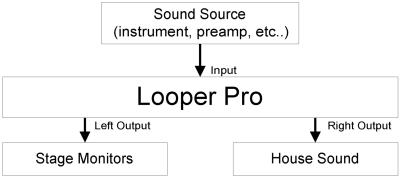
In situations where only a mono signal is being sent to the house sound, the stereo output of Looper Pro can be used to feed the mix with the built in click to the stage and the mix without the click to the mains. Because the click is only present on the left output channel, this simple setup will allow you to hear the click but not the audience.
Using MIDI ClockThis section describes how to use the Looper Pro with devices that support MIDI clock.
MIDI Clock is a simple MIDI message that can be sent from one device to another to provide musically syncronized operations. Typically, one device acts as the clock master and one or more other devices operate as slaves. The master defines the tempo and outputs 24 MIDI clocks per beat to keep the slave devices in sync.
The Looper Pro can act as either a MIDI clock master or slave. Generally, in any given setup, the Looper Pro will either be configured as the master or the slave but not both (except in more advanced setups).
The following setup shows the Looper Pro operating as MIDI clock master to a drum machine.

In this setup, the drum machine will follow the tempo set by the Looper Pro and stay perfectly syncronized to it. The Looper Pro's tempo can be tapped in in real time or can be preset. Different tempos can be programmed into the Command Macros to allow easy setup for different songs.
In this configuration, the size and number of beats set for the Master Loop (channel 1) define the tempo which generates the MIDI clock (and built in click). Loops in other channels will remain syncronized provided they use the same size as the Master Loop or are initialized as quantized to beat, bar or the Master Loop.
Note that some drum machines must be placed in the "Ext Sync" mode to operate as a MIDI clock slave.
The following setup shows the Looper Pro operating as a MIDI clock slave to a drum machine.

In this setup, the Looper Pro will set the size of its Master Loop (channel 1) based on the tempo of the MIDI clock being sent by the drum machine.
Note that in this configuration, audible artifacts will occasionally appear at the loop edge. This is due to the inherient jitter in MIDI clocks and the inablity of the Looper Pro to compensate. These artifacts are often masked by the sound of the drum machine itself but if you find that they are unacceptable, you might want to consider setting up your system using the Looper Pro as a MIDI clock master (no loop edge artifacts).
Using the Looper With Simple FootswitchesThis section describes how to use the Looper Pro with simple 3 button momentary footswitches. Though the role of each footswitch can be reconfigured using the GUI configuration program, the default footswitch configuration provides excellent control of the JamMan for a variety of situations. In the default footswitch configuration, the buttons are assigned the following roles:
Switch 1 button 1 - Bypass/Reset
Switch 1 button 2 - Tap
Switch 1 button 3 - Fade
Switch 2 button 1 - Page
Switch 2 button 2 - Function
Switch 2 button 3 - Channel

To create your first loop:
To layer new audio onto your loop:
To Mute/Bypass your loop:
To automatically fade your Loop:
To use the Fade to adjust the output level in real time:
To add a new loop Channel:
To Layer on Channel 1:
To add a new Page:
To return to the Page 1 channels/loops:
To select a different Function:
Using the Looper With a MIDI FootswitchThis section describes how to use the Looper Pro with a MIDI foot controller.
Command MacrosThe Looper Pro software includes a powerful command macro tool that allows you to create groups of commands (Macros) that can can be executed from incoming MIDI messages or footswitches. The command Macros can consist of parameter changes or triggers to the Looper Pro itself or MIDI messages that can be output to other pieces of gear in your rack. Outgoing messages can be Program Change, Continuous Controllers, Notes and System Exclusive messages while internal commands provide control of virtually all of the Looper Pro's parameters and triggers. See Appendix C for default Command Macros.
The Command Macro system is so powerful, it has completely replaced the Program Change and footswitch control mapping in the original JamMan. In the Looper Pro, a single MIDI Program Change, Controller or Footswitch can trigger up to 128 local commands or outgoing MIDI messages. For instance, Program Change 1 could set the pan of the channel 1 loop to left, channel 2 to right, set the init mode for each to be fixed (based on tempo and number of beats) , set the tempo for 130 and start the loop. All from one Program Change message. Program Change 2 could send a MIDI note to a drum machine for a tamboreen or a synth to play a chord.
For each Command Macro, a set of Press and a set of Release commands can be defined as well as a Macro name that will appear on the display when the Macro is executed. When triggered from incoming Program Change messages, only the Press commands are used but for Continuous Controllers, a controller value of 127 will trigger the Press commands and a value of 0 will trigger the Release commands. In many cases only the Press is used but the Release can be used to emulate things like MIDI keyboards where a press sends a Note On and a release sends a Note Of. The system can also be configured to execute the Press commands for either 0 or 127.
There are several different ways Command Macros can be accessed
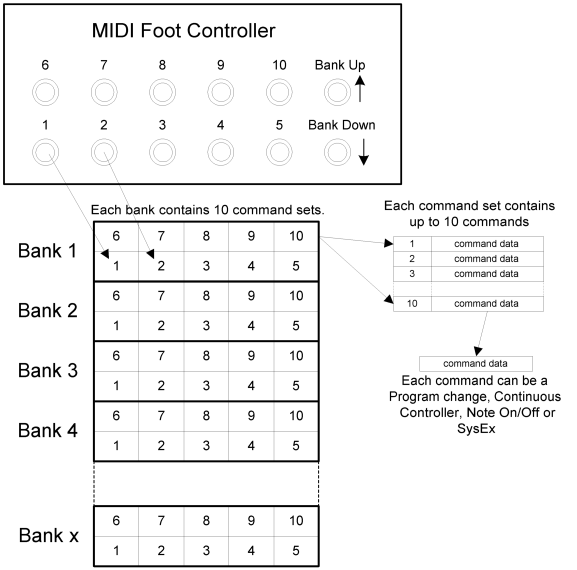
The biggest limitation with the Command Macros system is the total amount of command data that can be stored in the Looper Pro. When installed in a JamMan, the total amount of command data is limited to 2000 bytes while the Reflex hardware supports 8000 bytes. Command Macros are set up using the Looper Pro Editor software which automatically manages your command memory to be sure you don't use more than your hardware supports. In general, care should be taken to optimize your use of macro space.
Each macro consists of a 1 byte count for the number of press bytes, release bytes and name bytes (3 total). The actual data contained in the command is parsed one byte at a time up to the count and executed as appropriate (send MIDI data or execute local command).
Internal ControlsThis defines the interal controls that can be used in Command Macros.
| Id | Name | Description |
| 0 | Null | This is non-command. Does nothing. |
| 1 | System Trigger | This generates one of the System Trigger events. Refer to the System Trigger table. |
| 2 | Function | This selects one of the Loop Functions. Refer to the Loop Functions table. |
| 3 | Select Channel | Selects a Loop Channel |
| 4 | Select Page | Selects a Mixer Page |
| 5 | Set Slap Time | Sets the echo time of the slap. |
| 6 | Set Slap Level | Sets the level of the slap echo |
| 7 | Set Slap Pan | Sets the Left/Right position of the slap echo |
| 8 | Set Click Level | Sets the audio level of the click |
| 9 | Dry Level | Sets the audio level of the dry signal (when MIX pot is set to 100%) |
| 10 | Dry Pan | Set the left/right pan position of the dry audio. |
| 11 | Echo Divide | Defines the number of times a loop size is divided when the Echo Loop Function is used. |
| 12 | Echo Feedback | Defines the audio feedback level used in the Echo Loop Function. |
| 13 | Output Level | Sets the overall output level of the system. |
| 14 | Tempo | Defines the fixed tempo (if used) of the midi clock and click |
| 15 | Tempo Mode | Defines the tempo mode used: Fixed or tapped. |
| 16 | Num Beats Per Bar | Defines the number of beats/quarter notes per bar (time signature) |
| 17 | MIDI Soft Thru | Enables or disables MIDI thru for Controllers, Program Change and Notes. |
| 18 | Internal Clock | Enables or Disables the interal clock |
| 19 | Dest. Fade Rate | Sets the fade rate for the Destructive Fade Loop Function |
| 20 | MIDI PC Channel | Defines the MIDI Channel for Program Change messages detected by the system |
| 21 | MIDI CC Channel | Defines the MIDI Channel for Continuous Controlers detected by the system |
| 22 | Channel Level | Sets the audio level of a Channel Loop |
| 23 | Channel Pan | Sets the audio pan (left/right position) of a Channel Loop |
| 24 | Channel Num Beats | Defines the number of beats in a Loop Channel relative to the Master Loop. |
| 25 | Channel Repeats | Defines the number of times a Loop Channel will play after being triggered. 0 = infinite. |
| 26 | Channel Init Mode | Defines the method used to initialize the loop. Refer to the Channel Initialization Mode section. |
| 27 | Channel Init Function | Defines the Loop Function that is used when the loop is initialized |
| 28 | MIDI Click Note | Defines the MIDI note that is output on each beat of the Master Loop. 0 = disabled. |
Continuous Parameter ControlSetting Up continuous parameter control
Saving learned parameters
Editor for Windows and Mac Computers Advanced MIDI ControlAppendix A: SysExThis section describes the MIDI System Exclusive messages supported by the Looper Pro.
When various SysEx messages are received by the system, words are displayed on the Looper Pro front panel to acknowledge the event.
The Looper Pro uses a SysEx implementation similar to the one used on the Lexicon MPX 1, MPX 2, MPX R1 and other products. These systems all use a tree based approach to SysEx interactions with the system. The systems are constructed using software objects that are organized on a system tree which is similar to a disk drive or flash card. Folders can contain other folders and/or files which on these products are really parameters and collections of data. Files that are parameters have a size of 1, 2 and 4 bytes. The size of collections (or dumps) varies from object to object. For more on the LUSP protocol, refer to the LUSP Spec.
Appendix B: Error CodesAppendix C: Default Command Macros| # | Name | Notes |
| 0 | Toggle Main Fade | Fades all channels and click |
| 1 | Step Channel | The selected (not active) Channel |
| 2 | Step Page | The selected (not active) Page |
| 3 | Toggle Main Mute | All channels and click |
| 4 | Tap | Also toggles selected function |
| 5 | Step Function | The selected (not active) function. Tap to make active. |
| 6 | Set Active Channel | Makes the selected Channel active |
| 7 | Set Active Page | Makes the selected Page active |
| 8 | Toggle Fade Direction | Up or down. |
| 9 | Reset | Clear all loops |
| 10 | Select Channel 1 | Select or enque to initialize |
| 11 | Select Channel 2 | " " |
| 12 | Select Channel 3 | " " |
| 13 | Select Channel 4 | " " |
| 14 | Toggle Click | On/Off |
| 15 | Toggle Layer | From current mod to Layer mode to Loop mode |
| 16 | Toggle Replace | From current mod to Replace mode to Loop mode |
| 17 | Toggle Delay | From current mode to Delay to Loop mode |
| 18 | Toggle Make Room | From current mode to Make Room to Loop mode |
| 19 | Toggle Stop Start | Mutes all channels and restarts at the loop edge. |